O365: Meta Data - Auto Population for improved Search
See also - Other Office 365 Posts
Having discussed the advantages of using meta data so far we have touched only on populating these fields using manual entry, either by typing or by selection from a drop list.
If we wish to auto populate meta data fields we can do this in one or two ways.
Default Meta Content.
This method populates a Meta Data field with content that can be changed, removed or enhanced.
Any Meta Data field that is created by adding a SharePoint list or library column will have a default value setting.
This can be set in the List/Library Settings page to any value you wish. In the above illustration I have set the DocType column in a Training Documents Library. The effect is that any document created from the template in this library will be flagged as DocType = Training:
The content of the field can be subsequently changed or amended. So, A user could change "Training:" to "Training: SharePoint Library Meta Data"
You may note that "Training:" is an element of the taxonomy, as is "SharePoint Library" and "Meta Data". So, in this example you have a taxonomy with three levels of indexing, one created automatically and the other two added manually.
Automatic Meta Data Content Using Power Automate
This method populates a Meta Data field with content specified in a process. The content will always revert to the value specified in the process whenever the process is run.
Some Meta Data columns in Libraries and Lists don't show a default value setting.
However, you can still populate these fields using Power Automate.
The Title column has no default value setting.
Click on
the Automate icon and select See Your Flows
Select +Create from the left menu,
Then select Automated flow from the top gallery and skip the wizard
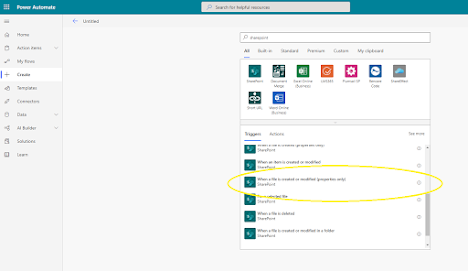
Type 'sharepoint' in the trigger search box
and scroll the triggers to locate the "When a file is created or modified (properties only)" trigger.
NOTE: SharePoint Triggers are very specific. If you are working with a List the triggers will be the ones that specify changes to an ITEM.
If you are working with a Library the triggers will be the ones that specify a change to a FILE.
In this case we are not seeking changes to either ITEM or FILE, but changes to the PROPERTIES of a file, i.e. Meta Data
From the drop lists choose the site and library. We can leave the folder entry blank as we want this to action for the entire library.
Click New Step and enter 'sharepoint' in the action search and scroll through the actions
to find the "Update file properties action".
From the drop lists choose the site and library, then click in the ID box. This will display dynamic content from the TRIGGER
That is, the data ID from step one which triggered the flow is available to identify which data item you wish the action to change. In this case we are changing a file property for the same item, so we can select the ID in the display to the right.
Now enter what you wish the Title field to contain.
Click on save and the flow will be ready to run.
Now whenever anyone makes a change to the Training Documents Library by creating a new document, or by changing the Meta Data for an existing document, the Title Meta Data field will be re-set to the value in the flow.
To Summarise
Two separate and independent methods to automatically update data contained in a meta data field or column.
Which is preferable will depend on exactly what you wish to do with data for your business. There are no hard and fast rules. You can also add IF, AND, OR conditions to the workflow to ensure that auto updates always fulfil your requirements.
Don't be afraid to experiment, make Office 365 work for you.


Comments