O365: Mobile Apps - the easy way
See also - Other Office 365 Posts
Anyone following these posts will now know how easy it is to create data stores in SharePoint for documents and files and for listing data, such as customer details.
We've also looked at making this data easily findable, how to flag items for the attention of individuals and teams within the Office 365domain and moving work through the system in a controlled manner.
We've also seen how we can access this content when away from the office via mobile apps for Teams, SharePoint and OneDrive.
Occasionally the standard apps aren't really convenient and fail to lend themselves to mobile use. I'm thinking here of functions like stock lists, customer contact lists and the like, when the standard app delivers too much detail for a small screen, or where links and buttons are small and difficult to use.
For these functions it would be better to deploy an app that is designed for fast, effective use on a mobile.
The drawback here is cost of development.
Make a Mobile App in O365
However, in Office 365 Mobile Apps for Android and IoS can be created from SharePoint Lists very simply, very rapidly and at almost no cost.
Most Office 365 plans include extensive Power Apps functionality, so the only cost required to generate such an app is a small amount of time.
To start, open the SharePoint list for which the app is requires
In the top menu click 'PowerApps' and select 'Create an App'
Enter a suitable name for the App and click create
The App will be automatically generated
in Power Apps Studio
Click on the > next to each browse entry and the app will display
Existing entries can be updated using the pencil icon, or deleted using the bin icon.
Use the + symbol on the browse screen to create a brand new customer list entry.
NOTE.
List Settings can be modified to control editing rights. In the default settings users can add, delete and modify records in the SharePoint List directly from the App.
The App can be shared with users by using the 'Share' button on the Power App Studio Home screen.
Refining The Search Function
Auto generated Power Apps will always create a Search Box that is based on filtering the Title meta data field of the list.
This can be changed quite easily.
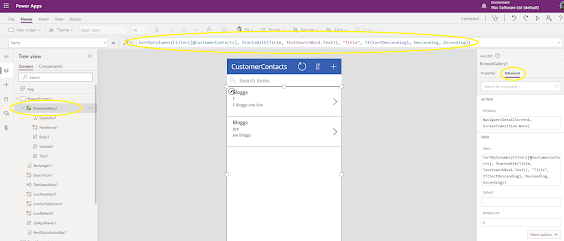
In Power Apps Studio, click on 'Browse Gallery1' in the left column
Select 'Advanced' in the right column and the sort and select formula will be displayed in the top formula bar.
This will be something similar to -
SortByColumns(Filter([@CustomerContacts], StartsWith(Title, TextSearchBox1.Text)), "Title", If(SortDescending1, Descending, Ascending))
Simply change the formula to replace the two 'Title' references with the name of the field you wish to use as the filter, so -
SortByColumns(Filter([@CustomerContacts], StartsWith(Company, TextSearchBox1.Text)), "Company", If(SortDescending1, Descending, Ascending))
Save the changes and the search box will work on company name instead of title.
Don't be afraid to experiment, make Office 365 work for you.


Comments