O365: Create a SharePoint List-On-Line
What is a List?
List Usage.
Create the List
- Open O365 in a browser. I prefer to use IE for this as Edge will not allow reliable copy and paste.
- Click on the app launcher icon
- Click on the tile for the Site where you wish to create the list. For the screen shots here I’ve used my own ffox Test site.
- I use ffox Test to test new ideas and processes.
- From the left hand ‘Quick Access’ menu select ‘Site Contents’
- Click the ‘add an app’ icon
- A dialogue will ask for a name for the new library, enter ‘Invoices’ and click create. Be sure to click the box for Show in Site Navigation.
- The new ‘Invoices’ list appears in the list and it will also be shown in the ‘Quick Access Menu’ on the left of the screen

However, in order to make the list fully functional there is some configuration to be done.Configure the new listWhen a new list is created in O365 SharePoint on-line automatically creates a number of default data fields. These can be viewed in the following way –
From the Site Home Page
There is no content as yet and this view will show just one field named ‘Title’.
By default SharePoint on-line creates seventeen data fields for any new list and these will be populated automatically for any entry in the list.
To view a list of all data fields click the ‘List' tab in the top left of the screen.
This will display the library ribbon. Select ‘Modify View’.
From this list on the settings page you will see all of the default columns (fields). Those with the ‘Display’ checkbox ticked will show on the default view seen in step 2 above. If the checkbox is unticked the data is hidden.
Utilising this you can choose what meta data you wish to display in the list default view. You can also create new views for specific purposes, this will be covered in a separate article.
However, not many of the columns (fields) in the default list are particularly relevant to the business function of recording Customer details, so we will need to create new columns and name them specifically. We can also choose if we want to require the users to enter data, or allow them to leave the field empty.

This will display the settings page for the Customers list. Around half way down the page the current fields (columns) are listed and below that are some action links, the first of which is ‘Create column’.
Before we create any new columns we need to consider what data we want to store. For this exercise we will create columns to store
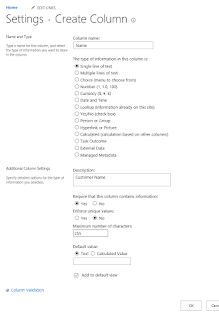
Customer Name
Address 1
Address 2
Address 3
Address4
Postcode
These few fields will give enough information to allow us to sort the contents of the list to display quite a range of information which will be useful to users in the future.
Start by clicking on ‘Create Column’

Then fill in the entries shown above and click ‘OK’ in the far bottom right of the screen.
Repeat the process for the remaining new fields -

Don’t forget to save it by clicking ‘OK’ after each new field.
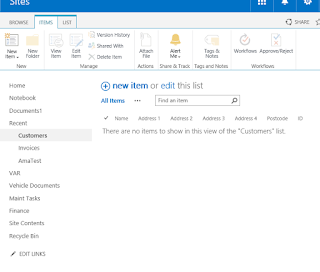
Click the "List" tab and select "Modify View" from the ribbon. Deselect the "Display" checkbox for "Title" and check the one for "ID" then return to the default view by clicking "Customers" in the quick launch menu on the left.

The new fields (columns) are now included and you are ready to start importing customer details to the list.
Entering Customer Details
The entry will appear as shown above. The ‘ID’ column is allocated a unique numeric key for each entry by SharePoint on-line. This cannot be deleted or edited and the ‘ID’ of deleted records are not reused.
Now that we have created a library and a list we can begin to explore interaction and links between the two.
Notes:
1. This assumes that the user has Internet access
2. Also that the user has been granted write access to the SharePoint site and library
3. If the library has ‘check in/check out’ enabled the user will be prompted to check out on opening and check in on
closing
4. If the library has ‘Approval’ enabled the document will not be visible to other users until ‘Approval’ has been granted


Comments